
Hey everyone! Today I will be going through how to use the Google Sheets budget tracker templates. This is a follow-up to my past post on budgeting and saving where I recommended the Google Sheets templates as a useful tool. (You can check out that article here)
For budget-related sheets, there are two options; ‘Annual budget’ and ‘Monthly budget’. I will be going through both of them and at the end, evaluating which one is better suited for you!
Getting the templates
I have covered how to get these templates in my ‘Importance of budgeting and saving’ article but I will go through them again in this article. Alternatively, I will link a copy of them at the end of the article.
One of the simplest tools that I use to track my budget and savings would be Google Sheets! We can make use of the available templates to help us. You can do such templates by:
- Under Google Drive click “New”
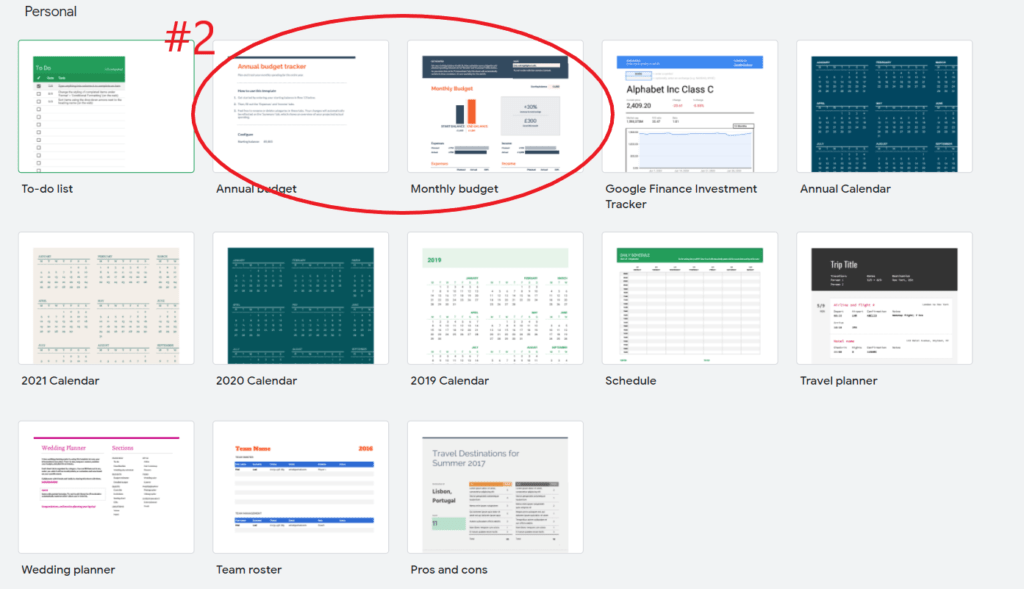
- Hover on the right arrow under Google Sheets and click “From a template”. (See #1)
- Under the “Personal” section, you can choose from two templates, “Annual Budget” and “Monthly Budget” (See #2). Each has slightly different uses but I prefer using the annual budget one.

Annual budget Google Sheets
Now, let us start with the Annual budget sheets. I will talk about how the Annual budget sheets work.
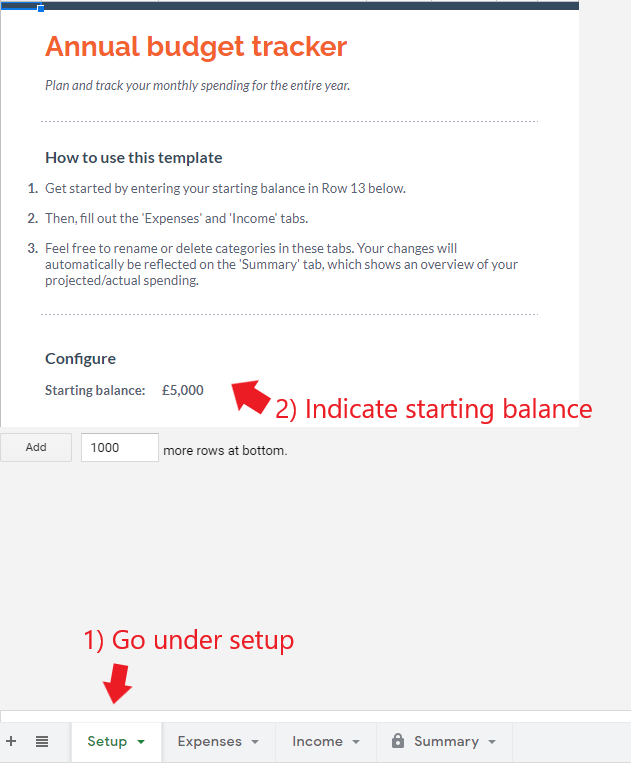
#1 First at the bottom of the sheets we will click ‘Setup’
#2 Next we will key in the starting balance. That we will need to tinker with for the setup page.
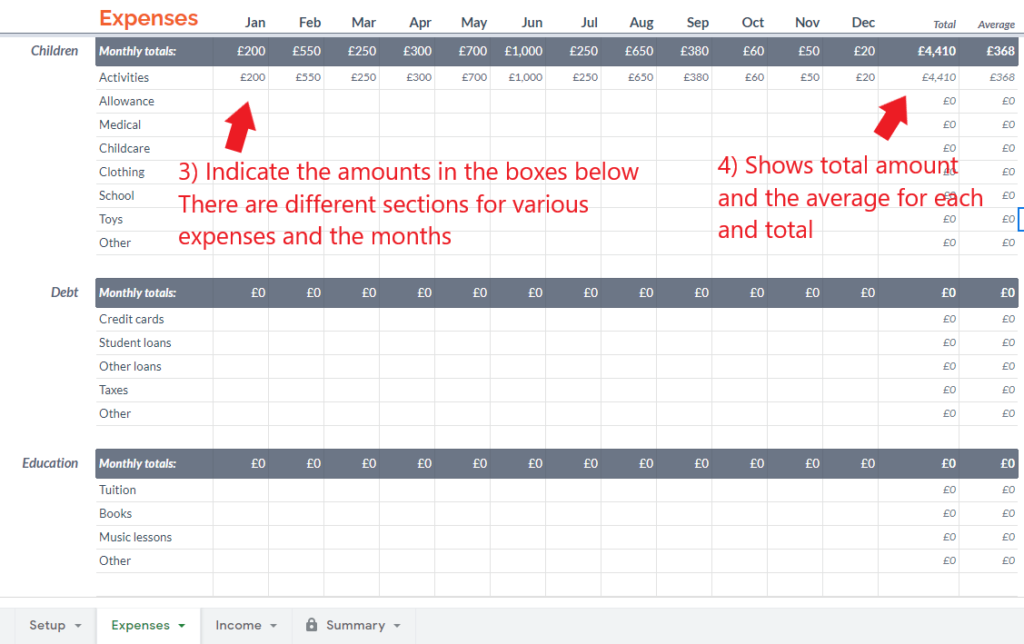
#3 Click on the ‘Expenses’ tab. In that sheet, you will see various rows and columns. The rows stand for the various expenses while the columns represent the months. All you have to do is to indicate in the cells (boxes) the expenditure for each expense for each month.
#4 On the right, you will see the last two columns ‘Total’ and ‘Average’. Total refers to the total expenditure while the average is the average salary across the months.
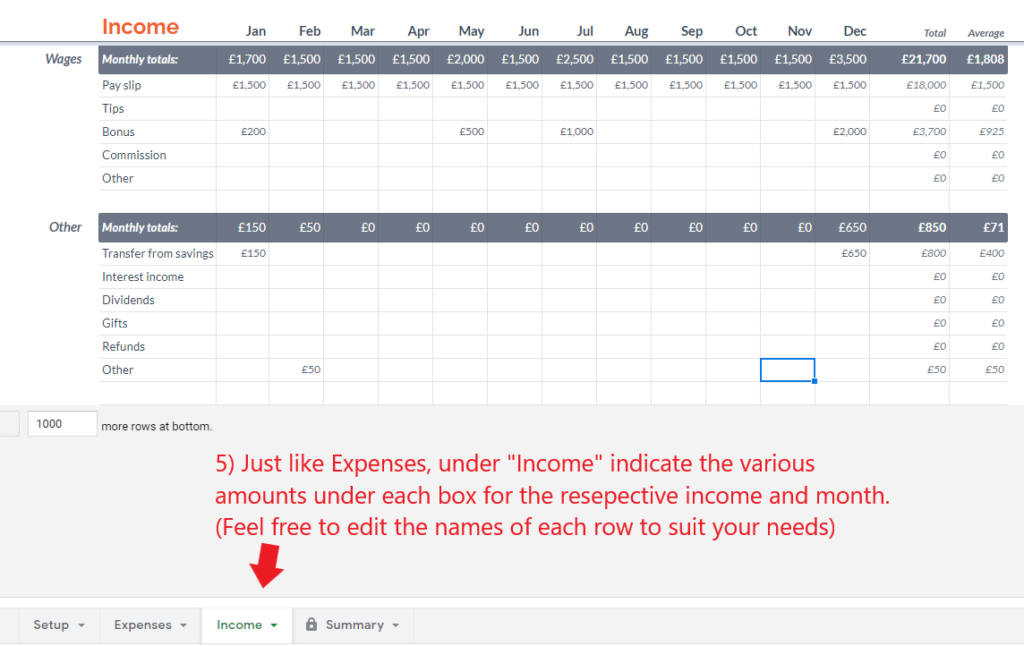
#5 We can also click on the ‘Income’ tab. We will then input the various income sources for every month. Unlike ‘Expenses’ which deduct from the balance, ‘Income’ will increase the balance.
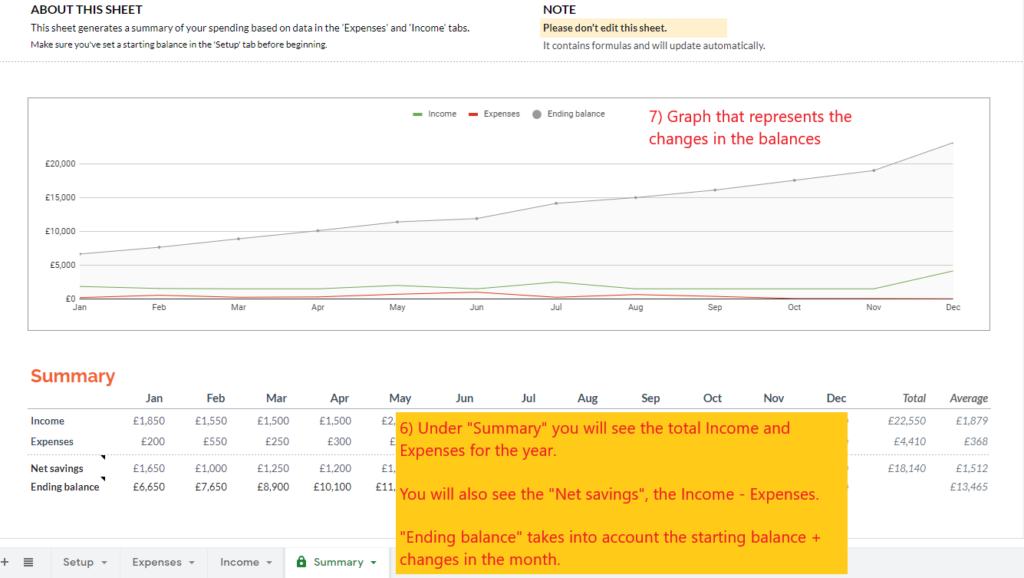
#6 Under the ‘Summary’ tab, you will find the summary of the monthly income and expenses, as well as the net savings and ending balance. Like the other sheets, you will find the total and average on the last two columns.
There is also a graph that shows the changes in total monthly income and expenditure as well as the changes in the ending balance over the months.
Do note that there is no need to edit this sheet at all. It will automatically calculate everything for you.
Net savings: Income less Expenses
Ending balance: Starting balance (of the month) + Net savings
Monthly budget Google Sheets
Next, let us cover the basics of the Monthly budget Google Sheets.
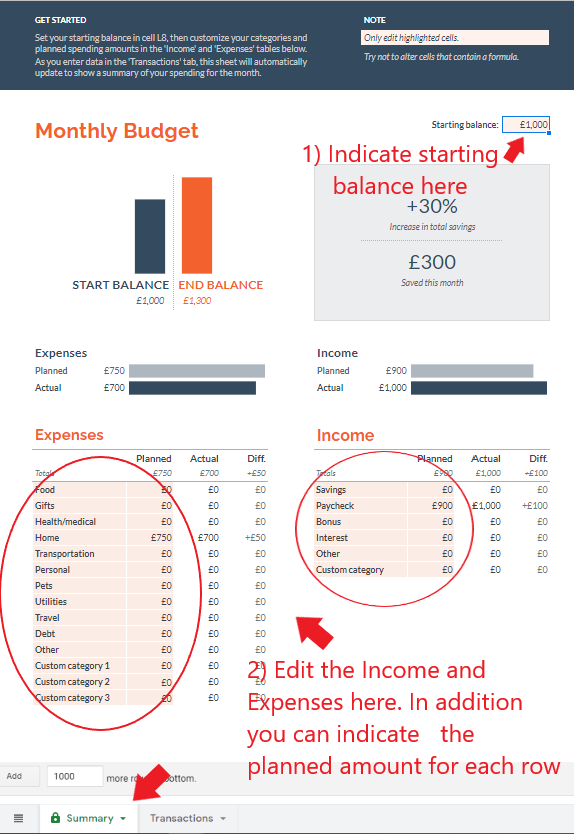
#1 Clicking the ‘Summary’ sheet, you can indicate the starting balance of the month at the top right corner of the sheet.
#2 Below the charts, you can edit the names of the categories for the various expenses and income. In addition, you can indicate the planned expenses and income for that particular category as well. More on that later.
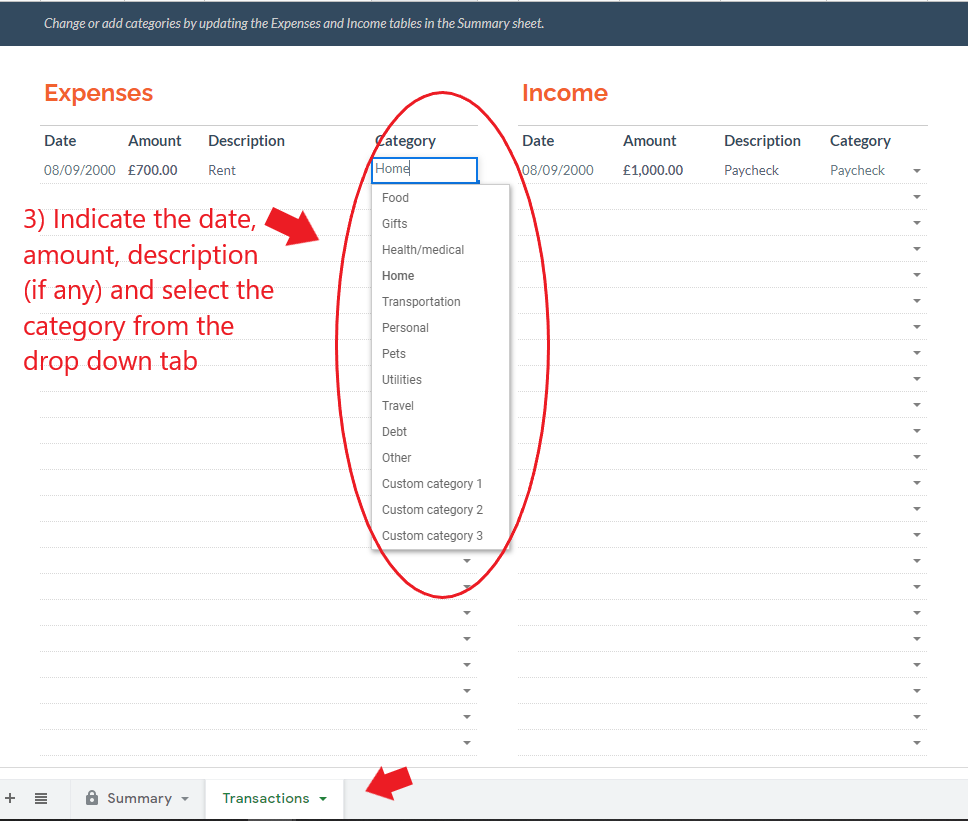
#3 Click on the ‘Transactions’ sheet. Here, you can indicate the various expenditure and income entries. You can input details such as date, amount, description and category. The two important must fill details would be the amount and the category. The category is a drop-down menu.
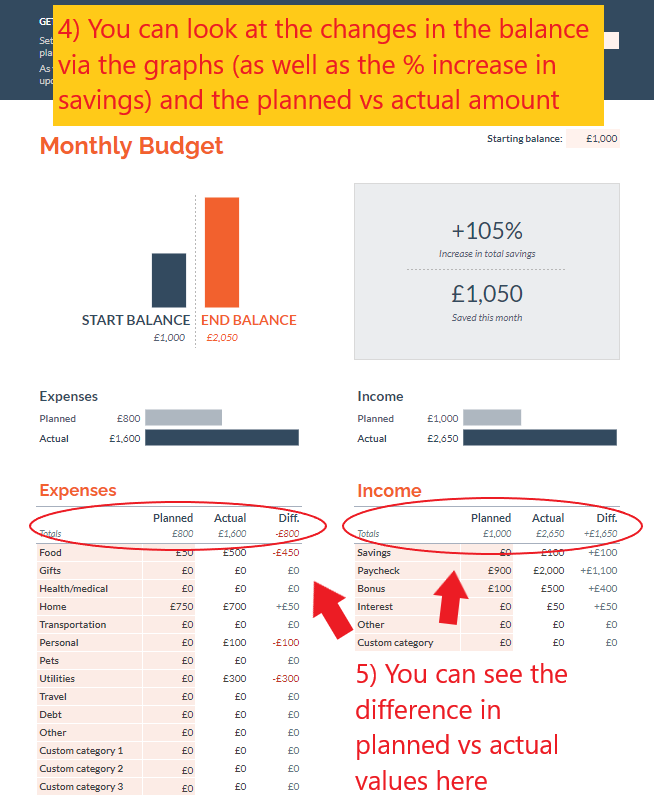
#4 You can go back to the ‘Summary’ sheet. Over there, you will find graphs that show;
- Starting vs Ending balance
- Expenses, Planned vs Actual
- Income, Planned vs Actual
In addition, you can see the % increase in total savings as well as the numerical value of the savings this month. Below the graphs, you can find the Planned vs Actual values and the difference (Planned – Actual) for each category as well as the total for expenses and expenditure.
And there you have it! A quick rundown on how to use both Google Sheets to track your budgeting.
Summary
And there you have it! Now, you know how to use both Google Sheets. Now, this begs the question….which should you use? I have listed the similarities and differences below.
Differences
| Annual budget | Monthly budget |
|---|---|
| Shows one year of budget | Shows one month of budget |
| Shows the total amount for each category | Show a specific breakdown of each transaction |
| Shows the monthly, total and average amount for each category | Shows the planned vs actual amount and the difference for each category and total |
Similarities
- Can set starting amount
- Both have expenses and income
- Allows for unlimited categories
When should you use the Annual Budget Sheets? Well, you should use it if you want to a) Tracking of yearly budget or b) Easy comparison of the month on month net savings and balance.
On the other hand, the Monthly Budget Sheets is more suitable if a) Tracking of specific transactions or b) Planning and allocating a specific monthly budget for each category.
For simplicity’s sake, I recommend using the Annual Budget sheets. However, for those more meticulous individuals, the Monthly Budget sheets may be a better alternative. Finally, you can even use both together to track various information if you like to track your budget closely!
Hope you found this resource a useful budgeting tool! In case you are unable to find it, I have linked it at the end of the article for everyone to access. Cheers, and stay tuned for more articles!
Accessing Budget Google Sheets Template
Access the Annual Budget Sheets and Monthly Budget Sheets by clicking the respective buttons. It will open the link to the Google Sheet in a new tab.
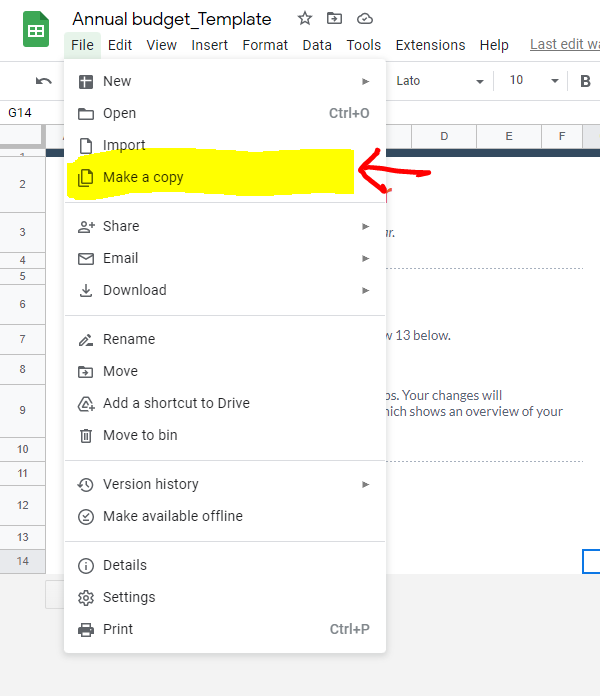
- Click File
- Click on ‘Make a copy’
- Save the copy onto your own Google drive

-Rice


oh my god, what a useful tip! I’ll use it for my budgeting this month!
Hope it helps your budgeting!